概述
使用 oauth2 保护你的应用,可以分为简易的分为三个步骤:
配置资源服务器
配置认证服务器
配置 spring security
本文重点讲解接口对接中常使用的密码模式(以下简称 password 模式)和客户端模式(以下简称 client 模式)。授权码模式使用到了回调地址,是最为复杂的方式,通常网站中经常出现的微博,qq 第三方登录,都会采用这个形式。简化模式不常用。
项目准备
首先引入依赖:
<dependencies>
       <!-- 注意是starter,自动配置 -->
       <dependency>
           <groupId>org.springframework.boot</groupId>
           <artifactId>spring-boot-starter-security</artifactId>
       </dependency>
       <!-- 不是starter,手动配置 -->
       <dependency>
           <groupId>org.springframework.security.oauth</groupId>
           <artifactId>spring-security-oauth2</artifactId>
           <version>2.3.2.RELEASE</version>
       </dependency>
       <dependency>
           <groupId>org.springframework.boot</groupId>
           <artifactId>spring-boot-starter-web</artifactId>
       </dependency>
       <!-- 将token存储在redis中 -->
       <dependency>
           <groupId>org.springframework.boot</groupId>
           <artifactId>spring-boot-starter-data-redis</artifactId>
       </dependency>
       <dependency>
           <groupId>org.springframework.boot</groupId>
           <artifactId>spring-boot-starter-actuator</artifactId>
       </dependency>
   </dependencies>
编写controller类,用来验证效果:
@RestController
@RestController
public class TestEndpoints {
    /** 商品查询接口,后续不做安全限制 **/
    @GetMapping("/product/{id}")
    public String getProduct(@PathVariable String id) {
        Authentication authentication = SecurityContextHolder.getContext().getAuthentication();
        return "product id : " + id;
    }

    /** 订单查询接口,后续添加访问控制 **/
    @GetMapping("/order/{id}")
    public String getOrder(@PathVariable String id) {
        Authentication authentication = SecurityContextHolder.getContext().getAuthentication();
        return "order id : " + id;
    }
}
配置资源服务器和授权服务器
资源服务器和授权服务器都是OAuth2的核心内容,这里我们在一个配置类中进行配置。
为了简化开发,这里将客户端信息放到内存中,实际项目开发中可以配置到数据库中。
token的存储一般使用redis,一来性能较好,二是本身就有自动过期的机制,符合token的特性。
@Configuration
public class OAuth2ServerConfig {
    private static final String DEMO_RESOURCE_ID = "order";
    @Configuration
    @EnableResourceServer
    protected static class ResourceServerConfiguration extends ResourceServerConfigurerAdapter {
        @Override
        public void configure(ResourceServerSecurityConfigurer resources) {
            resources.resourceId(DEMO_RESOURCE_ID).stateless(true);
        }
        @Override
        public void configure(HttpSecurity http) throws Exception {
            http.authorizeRequests()
                 //配置order访问控制,必须认证过后才可以访问
                .antMatchers("/order/**").authenticated();
        }
    }

    @Configuration
    @EnableAuthorizationServer
    protected static class AuthorizationServerConfiguration extends AuthorizationServerConfigurerAdapter {
        @Autowired
        AuthenticationManager authenticationManager;
        @Autowired
        RedisConnectionFactory redisConnectionFactory;
        @Override
        public void configure(ClientDetailsServiceConfigurer clients) throws Exception {
            String finalSecret = "{bcrypt}"+new BCryptPasswordEncoder().encode("123456");
            //配置两个客户端,一个用于password认证一个用于client认证
            clients.inMemory().withClient("client_1")
                    .resourceIds(DEMO_RESOURCE_ID)
                    .authorizedGrantTypes("client_credentials", "refresh_token")
                    .scopes("select")
                    .authorities("oauth2")
                    .secret(finalSecret)
                    .and().withClient("client_2")
                    .resourceIds(DEMO_RESOURCE_ID)
                    .authorizedGrantTypes("password", "refresh_token")
                    .scopes("select")
                    .authorities("oauth2")
                    .secret(finalSecret);
        }
        @Override
        public void configure(AuthorizationServerEndpointsConfigurer endpoints) {
            endpoints
                    .tokenStore(new RedisTokenStore(redisConnectionFactory))
                    .authenticationManager(authenticationManager)
                    .allowedTokenEndpointRequestMethods(HttpMethod.GET, HttpMethod.POST);
        }
        @Override
        public void configure(AuthorizationServerSecurityConfigurer oauthServer) {
            //允许表单认证
            oauthServer.allowFormAuthenticationForClients();
        }
    }
}
认证思路:
- client 模式,没有用户的概念,直接与认证服务器交互,用配置中的客户端信息去申请 accessToken,客户端有自己的 client_id,client_secret ,对应于用户的 username,password,而客户端也拥有自己的 authorities,当采取 client 模式认证时,对应的权限也就是客户端自己的 authorities。
- password 模式,自己本身有一套用户体系,在认证时需要带上自己的用户名和密码,以及客户端的 client_id,client_secret。此时,accessToken 所包含的权限是用户本身的权限,而不是客户端的权限。
如果你的系统已经有了一套用户体系,每个用户也有了一定的权限,可以采用 password 模式;如果仅仅是接口的对接,不考虑用户,则可以使用 client 模式。
配置 spring security
@Configuration
@EnableWebSecurity
public class SecurityConfiguration extends WebSecurityConfigurerAdapter {

    @Bean
    @Override
    protected UserDetailsService userDetailsService(){
        BCryptPasswordEncoder bCryptPasswordEncoder = new BCryptPasswordEncoder();
        String finalPassword = "{bcrypt}"+bCryptPasswordEncoder.encode("123456");
        InMemoryUserDetailsManager manager = new InMemoryUserDetailsManager();
        manager.createUser(User.withUsername("user_1").password(finalPassword).authorities("USER").build());
        manager.createUser(User.withUsername("user_2").password(finalPassword).authorities("USER").build());
        return manager;
    }

    @Bean
    PasswordEncoder passwordEncoder(){
        return PasswordEncoderFactories.createDelegatingPasswordEncoder();
    }

    /**
     * 这一步的配置是必不可少的,否则SpringBoot会自动配置一个AuthenticationManager,覆盖掉内存中的用户
     */
    @Bean
    @Override
    public AuthenticationManager authenticationManagerBean() throws Exception {
        AuthenticationManager manager = super.authenticationManagerBean();
        return manager;
    }

    @Override
    protected void configure(HttpSecurity http) throws Exception {
        http
            .requestMatchers().anyRequest()
            .and()
            .authorizeRequests()
            .antMatchers("/oauth/**").permitAll();
    }
}
重点就是配置了一个 UserDetailsService,和 ClientDetailsService 一样,为了方便运行,使用内存中的用户,实际项目中,一般使用的是数据库保存用户,具体的实现类可以使用 JdbcDaoImpl 或者 JdbcUserDetailsManager。
获取token
配置完成后,启动项目,使用Postman访问密码模式:
http://localhost:8080/oauth/token?username=user_1&password=123456&grant_type=password&scope=select&client_id=client_2&client_secret=123456响应如下: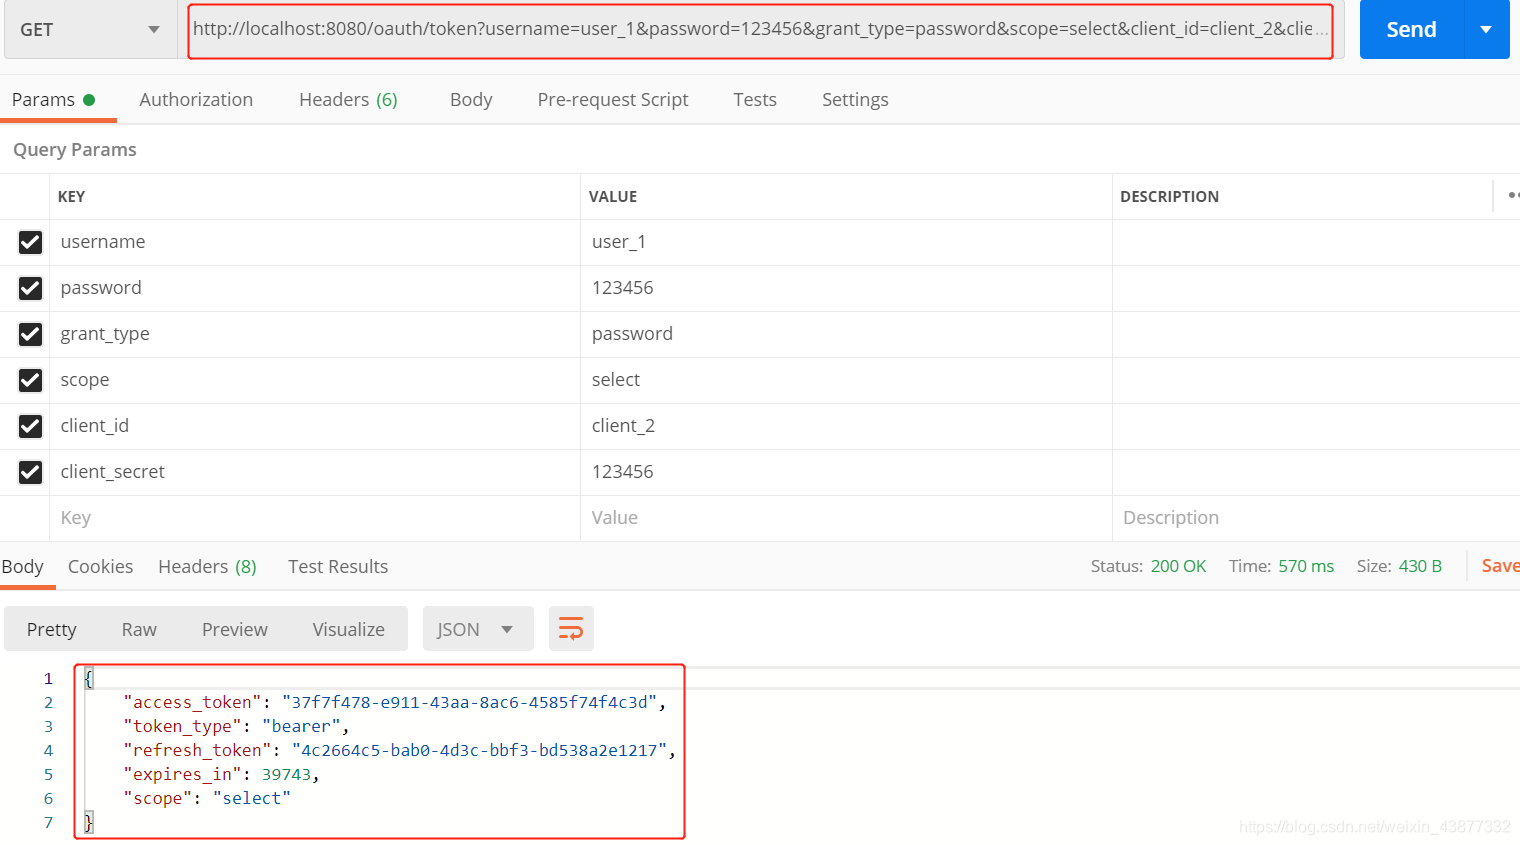
接下来试试客户端模式:
http://localhost:8080/oauth/token?grant_type=client_credentials&scope=select&client_id=client_1&client_secret=123456响应如下: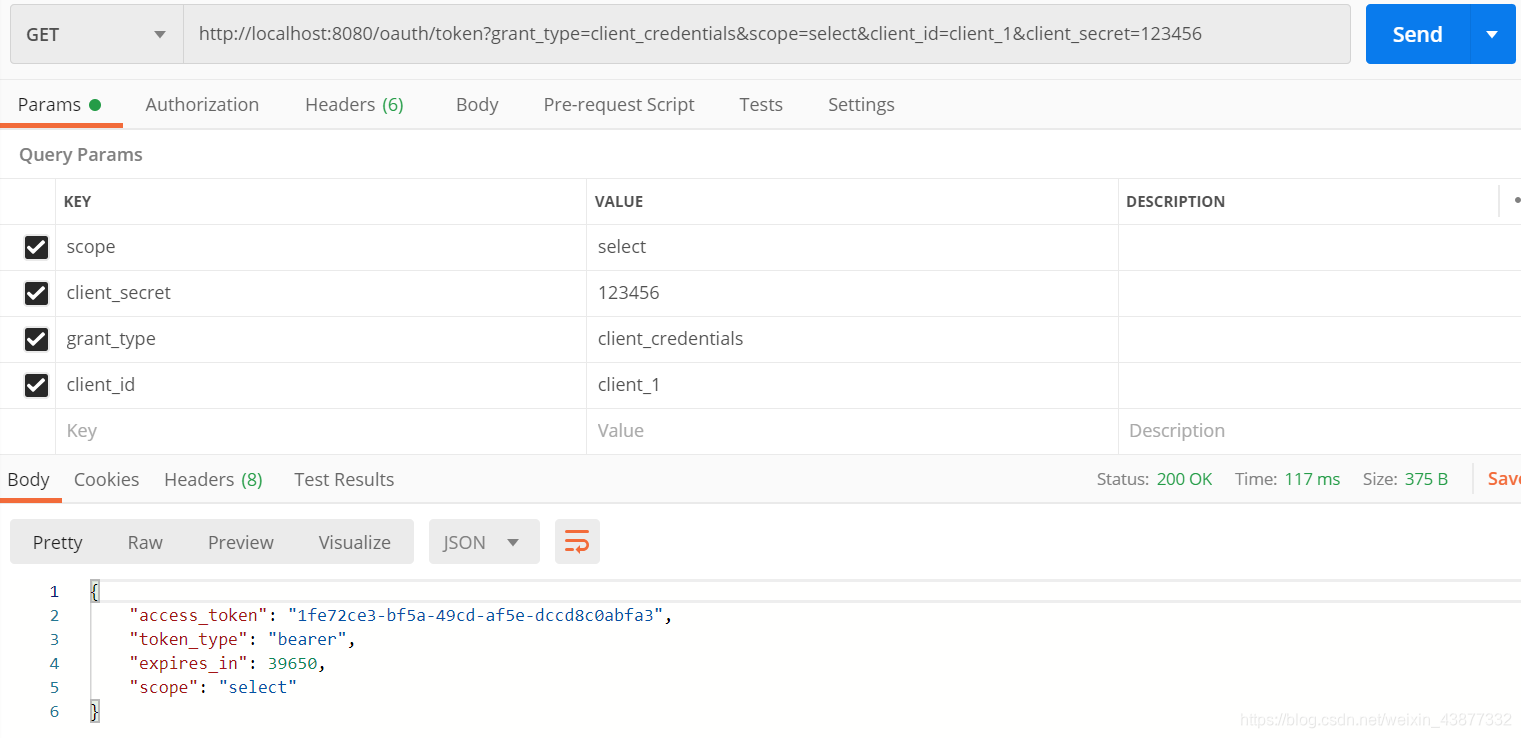
在配置中我们已经配置了对order资源的保护,测试如下:
而对于未受保护的product资源,访问效果如下:
接下来带有accessToken参数来访问受保护的order资源: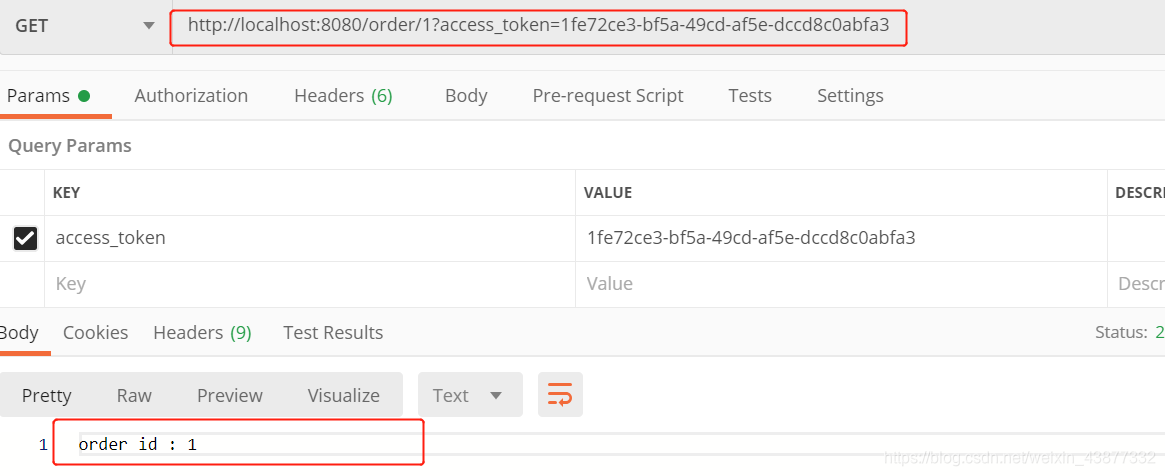
可以看到成功访问到了资源。
下面看下调试的情况:
密码模式下:
客户端模式下 :
本博客所有文章除特别声明外,均采用 CC BY-SA 4.0 协议 ,转载请注明出处!